**This is an old revision of the document!**
Table of Contents
Accessing CorteXlab
Note: If you do not have a CorteXlab account yet, please refer to the account section first.
Currently the access to the CorteXlab server is done via a direct ssh connection to the airlock. This is a SSH server whose sole purpose is to provide users with a UNIX home directory and several command line tools to interact with the testbed. Whenever you see the airlock name appear in this wiki this is the SSH server we are talking about.
Restrictions applying to the beta
CorteXlab is currently running in closed beta, hence only the development platform is available for beta users. The name of the development platform's airlock is: dev.cortexlab.fr.
Connecting using Linux/Unix
Step 1: Connect to the host
On a Linux/Unix host, the SSH connexion to the airlock can be done with the command:
you@yourpc:~$ ssh -X -v [-i path/to/the/key] -p 2269 username@dev.cortexlab.fr
Options:
-X is used for X forwarding (do not forget to execute xhost+ on your own machine)
-v is used for verbose mode
-p is used to specify the port through which the SSH connection is opened
-i is used to specify the path to the RSA key if it is not the default one (~/.ssh/id_rsa[.pub])
Step 2: Profit
You are using Linux, so that's about it.
Now you can jump directly to the last section of this page.
Connecting using Windows
On MS Windows, you can use Putty to open SSH connections to remote hosts.
Moreover, you can enable X11 forwarding on Putty and user a X11 server on your PC to open remote graphical applications. Xming is a suitable X11 server for Windows.
To do so, you must configure your connection.
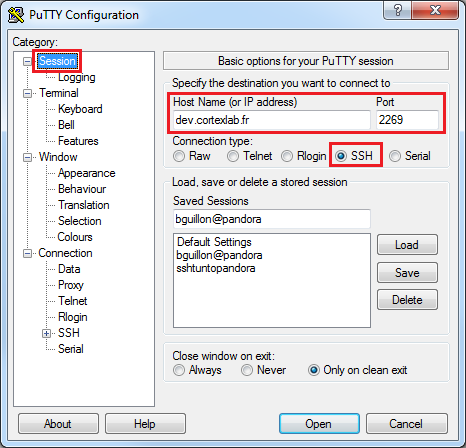
Step 1: Set the Host
Choose SSH as the communication protocol and set the host name of the server you want to reach, in this case the airlock dev.cortexlab.fr, on port 2269.
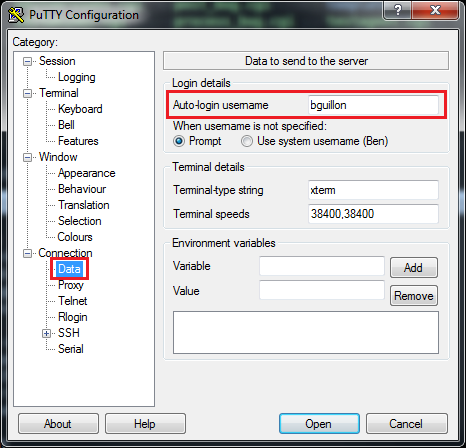
Step 2: Set the login username
Choose your login username in order not to re enter it every time you log in to CorteXlab. This is your CorteXlab account name (i.e. username).
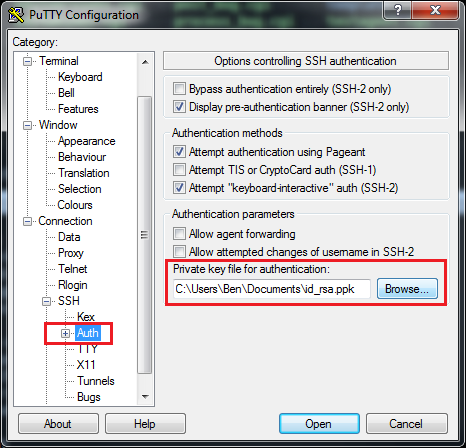
Step 3: Set the SSH keys to use
Of course, the authentication on CorteXlab is based on RSA keys (no password authentication is allowed).
You have to give the path to the private key file (and your public key should be alongside it, i.e same directory and same file name prefix).
More info on the key generation: ssh_key_help
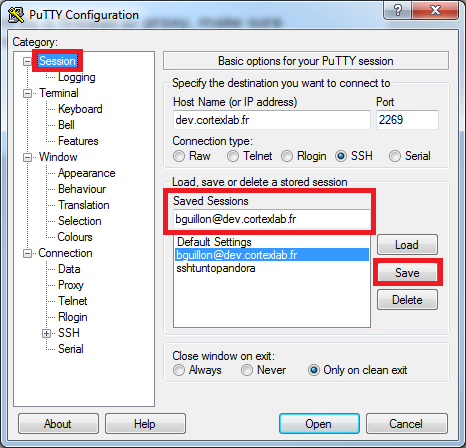
Step 4: Save the parameters
In order to use them next time, save the parameters as a session.
You will be able to load them directly from this menu afterwards.
Step 5: Log in through SSH
Just click the “open” button, no pics included this time ;)
Connecting using MacOS
To be done.
Once connected
You should now have access to your home directory on the airlock, on which you should find:
- A README file
- A directory
examplescontaining task examples - A read-only directory
resultscontaining the results of you experiments